
If you are looking at ways in which you can weld your aluminum, then you have a very wide selection to choose from. We are going to analyze each of them in detail and how you can go about applying them.
Step 1: Know The Type of Aluminum to Weld
Unlike welding common metals, welding on aluminum is different because it can easily crack and has a different structural composition. You will find that the weldability of aluminum as a metal varies across the different series.
Generally speaking, we use high-strength aluminum in sensitive applications such as aircraft. But in the real sense, we refer to these alloys mostly in the 2XXX and 7XXX series as ‘unweldable’.
Yes, you can weld them but they stand a very high chance of hot cracking when you try. This is because of the high zinc or copper content they possess therefore you should observe certain precautions.
When you opt for the 6XXX series, then you need to use an appropriate weld process to counter their cracking tendency. They may not be that strong but their commendable physical characteristics give them a good weldability.
As for the 4XXX series, we use it mostly as a filler material when applying weld on aluminum. They have a very low melting point thanks to the elevated amounts of silicone in them therefore not recommended for welding.
As for the 5XXX series, its weldability is exceptional and you can weld it in places that rely on structural integrity. You will find the same with the 1XXX and 3XXX but not for the same application as the 5XXX.
Step 2: Understand Precautions in Aluminum Welding
You may encounter several challenges when welding on your aluminum workpiece. We know how soft and sensitive aluminum is added to the fact that it develops an oxidized layer that acts as insulation.
Its workability rate is lower than other metals because of its low melting point and elevated thermal conductivity. You can easily end up with a burn-through on your workpiece if you are not cautious enough.
Let us analyze some of the challenges that you are most likely to encounter when welding on your aluminum:
Porousness
Aluminum has a very high hydrogen absorption rate when you heat it further in the molten state. When it solidifies upon cooling, the hydrogen separates itself from the aluminum metal.
This separation creates bubbles inside the structure of your aluminum workpiece. The result is a weakened metal that is very porous.
Thickness
You will experience various sizes of aluminum metal having varied material thicknesses during your welding processes. You should have the technical know-how to efficiently weld thinner aluminum workpieces to avoid burning through.
You should also be sufficiently conversant with the depth of penetration while welding aluminum with thick material. This ensures that your final product has a very strong weld despite its thickness.
Removal Of The Oxide Layer
Aluminum has an oxide layer that has a higher melting point than that of aluminum. You need to use a lot of heat to penetrate this layer during the welding process.
This may be challenging since you may end up having burn-through on your aluminum workpiece surface underneath it. You must regulate your heat enough to balance between the layer and your aluminum surface.
Removing Impurities From Aluminum
The sensitive nature of aluminum exposes it to various contaminants such as dirt or air when you are welding it. If your shielding is poor, then it can be easily contaminated by the air that comes into contact with the weld.
Oxygen weakens your aluminum workpiece and lowers its ductility and strength. To avoid all these, ensure that you carry out a thorough cleaning of your aluminum workpiece before welding on it.
Be Wary Of Cracks
The alloying elements you use may have different melting points that can result in your weld cracking. This is because such elements have different solidification rates that end up creating brittle compounds that easily break.
The thermal conductivity of aluminum also leads to cracks since the cooler parts rapidly absorb the heat from the weld spot. You can avoid this by preheating and postheating your workpiece to allow for a slow gradual cooling.
Thermal Conductivity
The aluminum metal you are about to weld contains very high thermal conductivity. This means that it rapidly dissipates the weld heat that it absorbs.
The result is a distortion of the workpiece you’re welding that makes it difficult to carry out the whole process. You can preheat your aluminum workpiece to ensure uniform heat dissipation before you begin welding.
Step 3: Choose the Right Aluminum Welding Technique
There are several welding techniques that you can go for depending on several factors such as availability of equipment. Your product specifications and aluminum grade also play a role in determining the technique you employ.
Let us have a critical analysis of some of them while listing their pros and cons in your application:
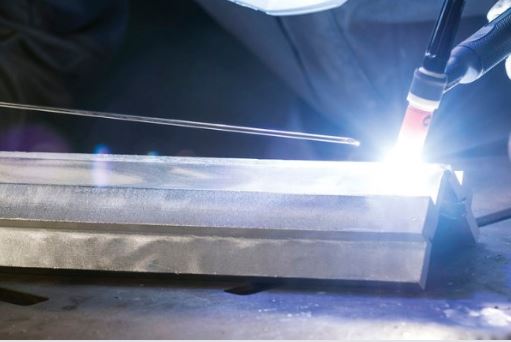
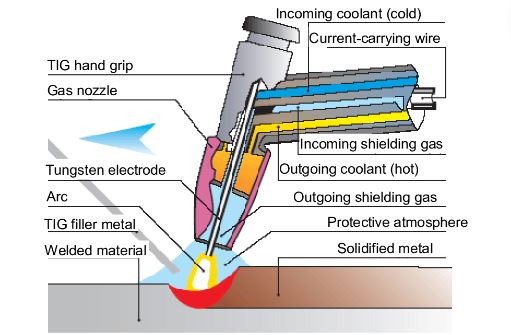
Tungsten Inert Gas (TIG) Aluminum Welding
This is a very popular welding procedure that we sometimes refer to as gas tungsten arc welding (GTAW). If you get your way right with this process, then you can get aluminum weld qualities of the highest standards.
You need to slowly dab some filler metal inside your aluminum weld puddle instead of mechanical wire feeding. In as much as it is a slow process, this slow pace results in the formation of neat and efficient welds that will not need many post-weld processes.
All welding aspects are directly under your control. You can regulate your welding heat based on your workpiece’s reaction meaning you can easily avoid burn-through errors.
The shielding gas we use here is usually argon. The oxidized aluminum is eliminated by the alternating current making this process clean and free of contaminants.
This process can be applied on aluminum of any thickness but the amount of amperage that you will set on your machine will determine the quality. You can also apply it on thin aluminum sheets.
Pros
- They can give you welds of the highest quality with a very clean appearance
- You can use this technique on aluminum grades of various thicknesses without significant destruction of their structure
- When you use an AC supply on your machine, you can get rid of the oxide layer. This means that you have a clear view of your weld pool as you proceed
- You can comfortably apply it on thinner aluminum workpieces without risking burn-through
Cons
- It is a very slow process when we compare it to MIG welding
- It is a complicated process and therefore you will take some time before efficiently running it
- it will cost you more to acquire the equipment for TIG welding
Gas Metal Arc Welding (GMAW) Aluminum
This is another widely used technique that we apply when we want to weld on aluminum. We can also refer to this method as metal inert gas (MIG) welding.
Compared to the tungsten in gas welding, you will experience elevated rates of deposition combined with accelerated travel speeds. It is different from TIG since you will not need a wire feeding system for your weld.
Instead, your wire feeding will be made possible by the use of a pull gun. Just like with TIG, you have to decontaminate and clean your base material to reduce the chances of your aluminum becoming porous.

Pure argon is recommended if you want your shielding gas to produce the best results based on its coverage. Also, ensure that your base material is free from moisture before beginning your weld on aluminum.
Pros
- It takes less time compared to TIG welding
- You can efficiently weld on thick aluminum materials
- It is an easy process therefore as a beginner you can learn fast
Cons
- The final weld outcome is not of the highest quality
- They cause a lot of burn-through when you apply this technique on thin aluminum workpieces
- They won’t give your work piece an aesthetic appeal when you need it
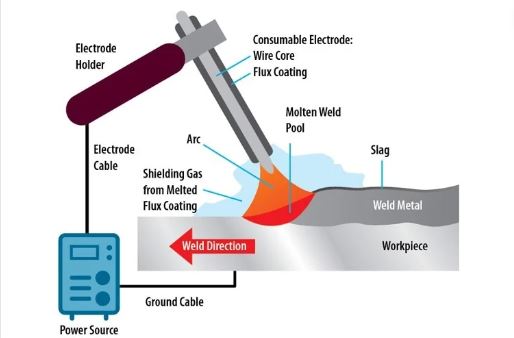
Shielded Aluminum Metal Arc Welding (SMAW)
I know the question you may be asking yourself is whether you can apply stick or arc welding on your aluminum. This is very possible although the downside is that you cannot achieve the type of quality weld you may want.
It is advisable that you resort to this technique only when you have emergency repairs that require a quick fix. However, the weld quality will not be something that you can write home about due to liquidation cracking.
Pros
- It is easily portable and you can carry it for field work repair jobs
- This welding technique is easy to learn and with sufficient practice, you can come up with quality welds
- The welds you produce are robust enough to withstand a lot of stress and strain
- You can acquire the equipment at a relatively cheaper price compared to MIG and TIG
Cons
- The rate of welding is very slow meaning you will consume a lot of time carrying out this technique
- This method consumes a lot of electrodes meaning in the long run, you will spend more on operations
- You will encounter a lot of challenges when welding aluminum having a thin material. This is because of the wide weld pool it can produce leading to frequent burn-throughs.
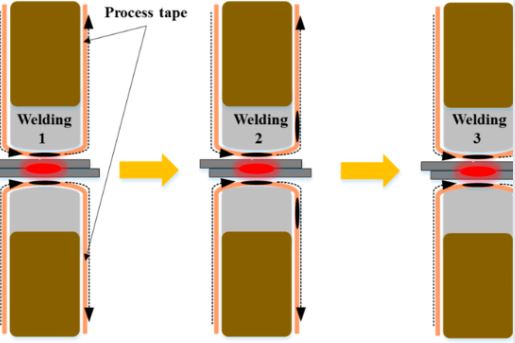
Resistance Welding Aluminum
This is a different type of weld on aluminum that relies on the pressure you apply on your metal. You have to apply extreme pressure between two aluminum metal surfaces and then introduce a current between them.
This method works well with aluminum because it has a very high thermal conductivity. However, you must be very cautious as this might end up damaging the structure of your aluminum.
If you follow the appropriate procedures, you will obtain welds that have superior quality compared to other techniques. Additionally, you will not need to use shielding gas because of the solid-state process of this technique.
Pros
- It is a very fast method and is ideal if you are dealing with mass production of aluminum parts
- The weld joints produced are very strong because the current produced penetrates the depths of the two aluminum pieces joined
- They are very precise since you can control the welding heat
- It is a safe welding method because you will see no sparks or fumes produced
- Due to the regulated energy it requires, it is very economical in the long run especially if you are bulk-welding aluminum
Cons
- You will spend a lot to acquire the expensive specialized equipment needed for this type of welding
- You cannot weld large pieces of aluminum because the heat used to weld is focused on a single spot
- For your welds to be very effective, you need to align your aluminum parts with the highest degree of precision. Any misalignment may lead to a distorted weld
Laser Beam Welding Aluminum
Since aluminum is highly susceptible to cracking on weld, this is one of the safest techniques you can apply. This is because you focus the electron or laser beam on a precise location on your aluminum surface.
You can easily control the heat-affected area and avoid the occurrence of cracks during your welding. They also produce very clean welds and the process is very fast.
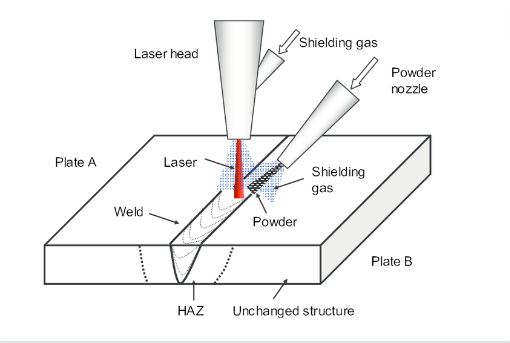
When you opt for a filler for this technique such as 4032, then you can comfortably weld crack-prone grades like the 6000 series.
Pros
- Reduced thermal impact because you have to focus the laser on your weld spot only
- It reduces your post-welding costs therefore while at the same time cutting down on your production time
- It is a very fast process and therefore saves time and your eventual cost of weld on aluminum
- Since it is an automated process, it increases your aluminum weld output while producing quality welds at a lower labor cost
- You do not need to use electrodes
Cons
- You will need a very high capital input to acquire the equipment needed for this technique
- It requires proper training and skills and therefore can take you time
- it is not feasible if you are carrying out small-scale welds on aluminum
Step 4: Choose The Right Filler Material to Weld on Aluminum
The function of filler material in aluminum welding is to fill the material between your two aluminum metal welds. When you expose them to heat, they become molten and flow between the two surfaces creating a weld.
The type of filler material you are going to use is majorly dictated by the aluminum grade you want to weld. The filler material has to align with the base metal in welding because it creates the properties of your final product.
Let’s take an example of the TIG welding process, your filler material will be in the form of long rods that are used on your weld puddle. As for the MIG welding technique, you will use spools of aluminum wire for your filler material.
Your choice of filler metal is as wide as the available grades of aluminum you can find in the market. You have to carry out extensive research before settling down on the most appropriate filler for your aluminum grade.
However, we have two main types of filler materials that are commonly used across various aluminum grades. Let’s have a brief look at them:
- 4043: you can use this filler on a variety of aluminum grades with the same pleasant results. The applicable grades range from the 2000 and 3000 series in addition to the 6000 series.
It has silicon incorporated into it that enhances its wetting action. However, this makes it harder for you to control its movement due to the fluidity of its puddle.
It offers a better penetration with brighter welds that can resist cracking. You can find them at a lower cost compared to the 5356.
Let us look at some of the weld on aluminum you can perform that are compatible with this filler:
- Applications that work in environments that are exposed to temperatures of above 70°C
- Applications that require zero shrinkage cracking
- Applications that require visual appeal since the bright welds from 4043 have an aesthetic value
- Applications that rely on minimal physical distortion of the aluminum part
- 5356: This is a filler material designed for use mostly with 5000 and 6000 grades of aluminum. Unlike the 4043 fillers, you cannot apply it when welding aluminum casings.
You also have to be cautious when applying at temperatures exceeding 70°C. This is because they are prone to temperature corrosion beyond such temperature limits.
On the upside, they can give your aluminum welds a higher shear strength and are recommended for parts that are anodized.
We can have a look at the possible weld-on-aluminum scenarios where you can best use this filler:
- When tensile strength is an application requirement like in the 5000 and 6000 grade series.
- If you want your base aluminum metal to have a uniform anodized color
- It can efficiently work in those applications that include dynamic loading
Step 5: It’s time to Weld on Aluminum
Now that you have everything in order, we can go straight to the step-by-step process of welding on aluminum. We will look at the common techniques and how you can go about each:
MIG Weld On Aluminum
- The first step is to make sure that your MIG set is using a direct current and that you have a shielding gas, most preferably argon gas
- You will require a push-pull wire feeding system because using aluminum filler wire will inconvenience you by jamming
- Begin by tapping your welding electrode approximately one inch from your target weld spot. After contact with your aluminum workpiece, quickly shift it to your weld target point.
- Maintain a constant angle between the welding electrode and your aluminum. Carefully apply the string bead procedure while moving the electrode along the weld.
- You should weld using moderate speed for the string bead but increase the speed as you approach the end of your weld
- An increased finishing weld speed ensures that the weld pool is precisely tapered off. This lowers the chances of your weld workpiece experiencing post-weld cracks
- Just as a precaution, the best position to point your weld gun is an upright position if your workpiece is aligned horizontally
TIG Weld On Aluminum
- You will need a shielding gas just like MIG with the preference still being argon
- Tack weld procedure on your aluminum is the easiest when you are using TIG welding to avoid distortion
- You will be required to be all hands-on as one of your hands will hold the filler rod with the other handling the electrode holder.
- Heat up your electrode to remove the tungsten contaminant. You can do this on a scratch block before transferring it to your aluminum workpiece
- A weld paddle will form first before you move your electrode along the aluminum surface
- This motion should be slow and alternates with backward and forward motion. Ensure that during such motions, your filler and electrode don’t have any form of contact
- You can gradually reduce the current as you approach your weld end to ensure a smooth weld finish. This will also avoid cracks or defects on your weld
Shielded Aluminum Metal Arc Welding (SMAW)
- Connect your welding power supply to either an AC or DC, connect your electrodes then power it
- Strike an electric arc by gently placing the electrode on the surface of your aluminum
- Slightly push the electrode back after an arc is formed
- Portions of the electrode form a weld pool on the surface of your aluminum
- Ensure that your electrode tip hits your aluminum workpiece at an angle and not perpendicular to prevent it from sticking
- The melting of the electrode will break down the flux covering that emits a shielding gas
- Move the electrode along the weld area gently for the filler to move from the electrode to the weld pool
- You have to take occasional stops to chip away the slags on the alumni surface during the whole welding process
Step 6: Post Welding Processes on Aluminum
Once you are done with your weld on aluminum, there are some procedures you need to carry out although not that mandatory. Some of them will strengthen the structure of your workpiece while others are purely aesthetic.
We can dive into some of them briefly and how beneficial they are to you post-welding:
Post Weld Cleaning
Some remnants of welding flax will be left on the surface of your aluminum workpiece once you are done. They tend to encourage corrosion and destroy the passivation film found on your aluminum surface.
You can clean these off by using hot water to rinse or a simple steam brush if your aluminum part has a simple basic shape. For complex parts, you need to brush and rinse them in hot water first.
You can then place them inside a solution of aqueous chromic acid for about ten minutes. Use a stiff brush to remove any remnants of the contaminants before drying them.
Post Weld Heat Treatment
This is not necessarily important unless your weld aluminum shows signs of stress corrosion post-welding. You can reduce this stress by heat-treating it to prevent stress-corrosion cracking.
You can check for requirements of this procedure from documents that come with your aluminum metal from your supplier. They will give you a detailed description of how you can anneal your aluminum to enhance its microstructure.
Conclusion
When we compare the weld on aluminum to other types of metal, it is evident that it produces a totally different reaction. This means that you should plan your weld on aluminum with an open mind devoid of presumptions.
The best way you can carry this out is to settle on a welding technique and carry it out patiently while observing all the precautions we have discussed. It may frustrate you a bit but with sufficient practice, you can easily carry it out.
ore Resources:
Sheet Metal Welding – Source: KDMFAB
How to Weld Aluminum – Source: UTI
Top Aluminum Manufacturers – Source: KDMFAB
How to MIG Weld Aluminum – Source: WeldGuru
Aluminum Sheet Metal Fabrication – Source: KDMFAB
Welding Aluminum – Source: WeldGuru
MIG Welding Aluminum – Source: Make Money Welding
How to Weld Aluminum – Source: The Instructables
Weld Aluminum Guide – Source TWI